
Bike Fits - Dunsborough Physiotherapy Centre
Need a Bike Fit? Phone Now: (08) 97553600
Health Rebates Apply
Health Rebates Apply
 Bike Fitting
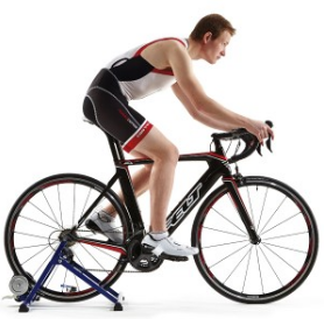
At Dunsborough Physiotherapy Centre we offer Bike Fits for riders of any standard, from beginners to elite athletes. Ben Liston - a physiotherapist with over 20 years of physiotherapy experience - has ridden over 50 000kms in recent years on local roads and trails. He is a passionate rider and understands the importance of good bike positioning to achieve maximal performance, but also to ensure comfort on those longer rides.
Our Bike-fitting service involves a number of assessment methods including goniometry (to assess joint angles), measurement in relation to horizontal and vertical levels, and the incorporation of a number of research-based scientific equations used by leading bike-fitters around the world. This will allow you to be positioned in the most efficient and comfortable position for your body type and bike choice.
Below are some of the basics required to achieve a reasonable position on the bike, but to achieve the ideal position (what we call the fit zone) book in for an appointment at Dunsborough Physiotherapy Centre (private health rebates apply).
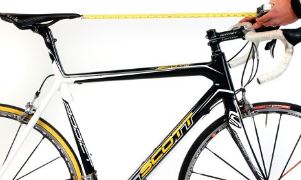
 Centre of Bottom Bracket to Top of Seat Centre of Bottom Bracket to Top of Seat
Seat Height
At the basis of any accurate bikefit is correct seat height. At Dunsborough Physio we use a number of measurement methods to ensure optimum position. One of the more accurate estimates of correct seat height is the Lemond measure: this is an equation using inner seam measure. After measuring your inner seam this distance is multiplied by 0.883. This then gives the height from crank centre to seat top you should be aiming for. |
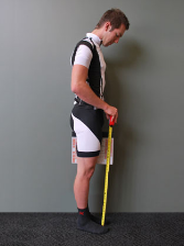 Inner Seam Measure Inner Seam Measure
Inner Seam Measure: standing in a relaxed posture (socks on, shoes off) slide a book up between your legs as far as you can. Now measure from the top edge (spine) of the book to the ground using a metal tape measure (make sure the book spine is horizontal).
|
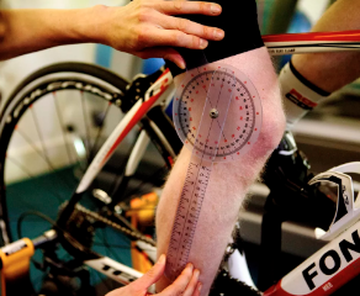
Other ways to assess correct seat height:
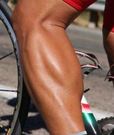
Knee angle at bottom dead centre (BDC): measured with goniometry: 25-35 degrees for road bikes, 35-40 degrees for mountain bikes.
Knee angle at bottom dead centre (BDC): measured with goniometry: 25-35 degrees for road bikes, 35-40 degrees for mountain bikes.
 Back Pedaling Method
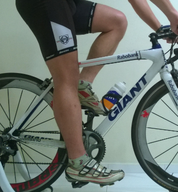
Other ways to assess correct seat height:
Back Pedaling Method: unclip your shoe from the pedal and place your heel on the pedal. As you back stroke your heel should just remain on the pedal at bottom dead centre without having to tip your pelvis.
Back Pedaling Method: unclip your shoe from the pedal and place your heel on the pedal. As you back stroke your heel should just remain on the pedal at bottom dead centre without having to tip your pelvis.
 KOPS (knee over pedal spindle)
Saddle Fore / Aft Position (KOPS)
KOPS (knee over pedal spindle) is a guideline for correct seat fore/aft position. A vertical line from the tibial tubercle (situated below the patella) should intersect the centre of the pedal spindle. This can be ascertained using a plumb line or laser level. There is some room to move with this position (anywhere from 3cm behind the vertical line through the centre of spindle to 1cm in front is acceptable). KOPS method for seat fore/aft position places the rider in a position adopted by most riders to achieve a balance of comfort and power.
For time trialers the seat position may need to come forward to develop greater power on the flat. Remember that the further you come forward the greater compression under the patella which can create knee pain. If you are climbing hills regularly the seat may be better suited in a slightly more aft position as this allows for better power delivery when climbing slopes.
 Bike Fitting - Reach Bike Fitting - Reach
Reach
There are a number of ways of assessing appropriate reach for a rider. The correct reach will vary from rider to rider depending on flexibility and strength. The distribution of weight method: 40-45% through the front end and 55-60% through the back end. |
 Shoulder Flexion and Elbow Extension Angles Shoulder Flexion and Elbow Extension Angles
Other Ways to Assess Reach
Elbow angle: With your hands resting on the hoods measure your elbow extension (via goniometry). The angle of elbow extension should be between -ve 15 degrees and -ve 25 degrees. Shoulder angle: aim for approximately 90 degrees of flexion (hands resting on the hoods). |
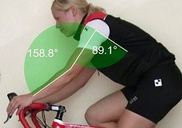
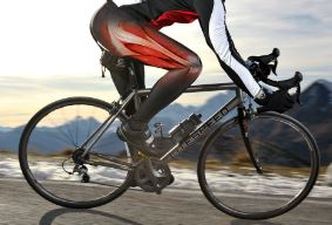
 Bike Fit - Hip Flexion Bike Fit - Hip Flexion
Other Ways to Assess Reach
Hip Flexion Angle: at the bottom of the pedal stroke hip flexion angle should be between 55-70 degrees (measured via goniometry from the horizontal). |
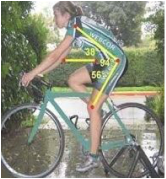
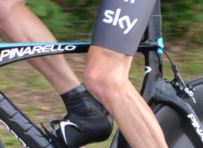
 Bike Fit - Trunk Flexion Bike Fit - Trunk Flexion
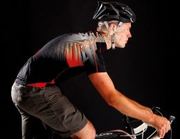
Other Ways to Assess Reach
Trunk Flexion Angle: approximately 45 degrees from the horizontal for road bike riders and approximately 50 degrees for mountain bikers. |
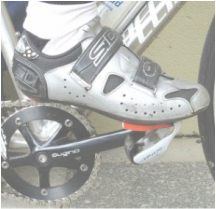
 Bike Fit Cleat Position
Cleat Set Up (Foot Position)
The centre of the pedal spindle should be located between the base of the 1st metatarsal and the base of the 5th metatarsal. Taller riders should aim for pedal spindle axis lining up more-so with the 5th metatarsal base, whilst shorter riders should aim for the pedal spindle axis lining up with the 1st metatarsal base.
In regard to cleat rotation always aim to recreate your natural stance posture - neutral, outward rotation (duck-footed), or inward rotation (pigeon-toed).
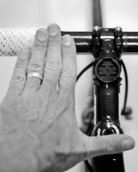 Stem Length Measure Stem Length Measure
Stem Length
Should be between 100mm - 120mm. The shorter the stem the less control, in particular when cornering. A rough guide: stem length from centre of steerer tube to top of handlebar surface is equivalent to the distance from the thumb inner edge (with the thumb 90 degrees to the palm) to the fingertips. |
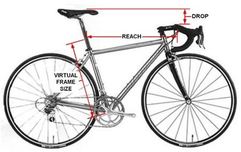 Bike Fit Drop Distance Bike Fit Drop Distance
Drop
Though professional riders often ride with a more dramatic drop, mos riders should aim for a drop of 2.5 - 8cms. The greater the drop the greater chance of back pain, hip impingement, neck pain, and hand numbness. |
Other Elements Addressed during Bike Fits at Dunsborough Physio Centre
As required we will assess your flexibility and core strength as this greatly affects your ability to adopt more aggressive postures on the bike. We have real-time ultrasound used to accurately assess core musculature activation.
Joint Angles - multiple goniometry measures are taken to ensure you are in the most efficient and comfortable position.
Q Angle - matching tibial rotation to natural stance.
Handlebar Width - related to shoulder width (measured from acromion).
Handlebar Tilt - altered to adjust reach / grip position.
Seat Tilt - usually horizontal positioning. Tilt 1-5 degrees downward to relieve back pain.

Choosing the Right Bike Size
If the bike frame you own is not suited to you it can be difficult to achieve an efficient and comfortable position on the bike. So how do you know what is the right size for you? There are a number of sizing charts which are readily available online and most manufacturers do have their own sizing charts, but these do not factor in an individual's flexibility / core strength / or lower limb / upper limb / trunk ratios. For instance females typically have a greater lower limb / trunk ratio (ie longer legs) than males. For more information re: sizing go to https://www.evolutioncycles.co.nz/bike-size-guides
What to look for when purchasing a bike other than sizing charts:
Before reading on please remember: if you are not sure what to do PLEASE come in to Dunsborough Physio Centre and we will check that a certain bike frame size you are considering will allow you to achieve an efficient and comfortable position on the bike. There is nothing worse than seeing someone spend a fortune on a bike only to find that it is the wrong size.
Work out your correct seat height: the quickest way to check this is to use the LeMond measure / back pedaling method. Once you have raised the saddle to the correct height assess the amount of drop with the seat at this level. If the drop is dramatic (greater than 8cm) the frame may be too small.
Assess the reach: you should be able to reach the handlebars without the elbows locking out. Your shoulder joint angle should be around 90 degrees with your hands resting on the hoods. Your trunk angle from the horizontal should be around 45-50 degrees (or greater if you lack flexibility). Your sit bones (ischial tuberosities) should rest on the appropriate area of the saddle, and you should not be feeling heavy pressure on your perineum.
Assess stem length: once you feel that the seat height and reach are close it is time to check stem length. Ideally stem length should be around 100mm - 120mm. For taller riders this length can be slightly greater and for shorter riders the length can be slightly shorter. If you feel you need a much longer stem to achieve an appropriate reach the bike frame is most likely too small. If you need a much shorter stem the bike frame may be too big. Remember that a short stem can lead to the bike feeling unstable / twitchy when cornering and moving at pace.
Male / Female Specific Frames: due to the fact that males and females have different trunk / lower limb / upper limb ratios I think that gender specific bikes with varying geometry are useful in achieving a comfortable / efficient bikefit.
Wheel Size: Mountain Bikers have a number of choices in regard to wheel size. Common sizes are 26 ínch, 27.5 inch and 29 inch. The larger wheels will allow you to ride up and over obstacles more easily. They will also maintain momentum, have reduced rolling resistance and increased stability. The disadvantages include limited manoeuvrability and handling in part due to the longer chainstays. The wheel size you choose should relate to how you will use the bike. If you are on twisty tight tracks regularly, consider the smaller wheel sizes for their manoeuvrability. If you are predominantly cruising on flat roads / trails, consider the larger wheels which maintain their momentum and have lower rolling resistance.
Cycling Injuries - Potential Causes and Solutions
 Bikefit - Hip Pain
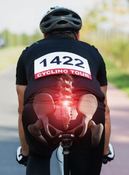
Hip Pain
Anterior Impingement- pincer / cam deformities can lead to impingement at the front of the hip joint. Labral pathology can also create pain. Too much drop / reach can add to this problem as the hip flexion angle is lessened.
Trochanteric (Hip) Bursitis / Gluteus Medius / Minimus Tendon Pathology- rocking on the saddle due to a lack of stability in pelvic stabilisers and core musculature, or having a saddle positioned too high can lead to hip pain. The rocking action overloads the tendons attaching onto the side of the hip and frictions the trochanteric bursa which can lead to bursitis.
Iliac Artery Compression- much like hip impingement, iliac artery compression can occur if the hip angle is too closed. Symptoms include cramping, burning, aching, or bursting pain in the lower limb and obvious power loss.
With all of these conditions increasing the hip angle should give relief (i.e. lessen drop / reach)
 Bikefit - Knee Pain
Knee Pain
Anterior Knee Pain- commonly due to retro-patellar loading leading to patellofemoral syndrome. Pain is felt around and behind the knee cap. Common causes of this type of pain include a saddle too far forward / too low, cranks which are too long, cleats positioned too far back on the shoe, leading to the knee being positioned too far forward. Along with changing your bike set-up stretching the ITB / quadriceps can help to alleviate patellar compression and improve patellar tracking.
Medial (Inner) Knee Pain- increased torsion on the knee can lead to medial meniscal pain. This can be due to a number of factors including incorrect saddle height (too high / low), cleat position (rotation not matching natural stance posture), excessive float, and increased stance width (which can be resolved with cleat position alteration or shorter spindles).
Lateral (Outer) Knee Pain- overtensioning of the hamstrings and increased friction of the ITB can lead to lateral knee pain. Factors affecting this include too much saddle height, incorrect cleat posturing (over-rotation), excessive float, and stance width being too narrow (alleviated by moving the cleats in on the shoe / using longer spindles). Along with alteration of bike positioning, stretching of hamstrings / ITB can be helpful.
Posterior Knee Pain- often develops due to a saddle which is too high or positioned too far back. This leads to overloading of posterior structures of the knee including the hamstrings. Certain saddle shapes can also create posterior knee pain due to pelvic blocking which over-tensions musculature behind the knee joint.
It is always worth checking knee range of movement if pain is experienced around the knee. The ideal knee joint ranges are: 25-35 degrees of flexion for road bike riders, and 35-40 degrees of flexion for mountain bikers at the bottom of the pedal stroke (BDC). At the top of the pedal stroke (TDC) aim for approximately 110 degrees of knee flexion (for road bike riders) and 115 degrees of knee flexion for mountain bikers.
 Bike Fit - Foot / Ankle Pain
Calf /Foot / Ankle Pain
"Hot Foot" also known as Morton's Neuralgia- this issue presents as altered sensation around the base of the toes and into the tips of the toes including pain, tingling, burning, numbness, and heat. This is often due to shoes which are too narrow, or over-tightened leading to nerve compression between the metatarsal heads of the foot. Remember in hotter weather the feet will swell slightly and your shoes may need adjusting on a long ride. Appropriate arch support can also be helpful to lessen pronation and forefoot compression.
Foot Cramps- related to shoe sizing: wearing shoes that are too small can lead to toe clawing which fatigues muscles of the foot. A lack of arch support can also be a factor.
Outer Sided Foot Pain- wearing shoes that are too tight (too narrow), using a shoe with a high carbon sole, or waterfalling (the outer aspect of the foot wanting to fall over the outer edge of the pedal) can create pain over the outer aspect of the foot. Move your cleat position and alter your footwear as appropriate.
 Bikefit - Calf Pain
Calf pain in cyclists is often due to incorrect seat height. If the seat is too high the rider will toe point at the bottom of the pedal stroke which leads to the calf overworking. Cleat position is also important. If the cleat is positioned towards the front of the shoe the calf works harder to maintain foot stability on the pedal leading to fatigue. If the cleat is positioned too far back on the shoe this can lead to toe pointing which fatigues the calf due to a mechanically disadvantaged position. Always aim for a cleat position which maintains a more neutral foot posture.
 Bikefit - Saddle Soreness
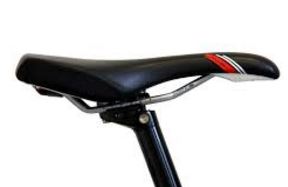
Saddle Issues
Bottom / Perineal Soreness - Is the saddle level? - too much forward tip can lead to sliding forward on the saddle increasing weight on the perineum. Is the reach too great? - this can lead to increased pressure on the perineum. Is the saddle too low? - this increases load on the bottom and perineum. What is the foam density of the saddle? - harder seats can lead to bottom (ischial tuberosity) pain, whilst a softer seat can lead to perineal pain and numbness. Does the saddle have a cutaway for the perineum? - this will suit some, but not all riders. Do your bike shorts / bibs have adequate padding? These issues need to be assessed to ensure comfort on the saddle, particularly on longer rides.
Frictioning Issues- leg length discrepancy can lead to rocking on the saddle which can create frictioning. A saddle rotated off centre can lead to perineal frictioning.
 Bikefit - Low Back Pain
Low Back Pain
There are a number of reasons for low back pain related to riding. Increased frequency and intensity of hill climbing is a common source of problems. A saddle height too high can lead to rocking on the saddle which can be aggravating to the low back. Forward tilting the saddle between 1-5 degrees can relieve back pain. Too greater reach or increased drop can create pain due to the increased lumbar flexion required. A torso angle of 20 degrees is adopted by time trialists, 35 degrees for professionals and around 45-50 degrees for recreational cyclists. Start off with a less aggressive posture and change this gradually over time to lessen the chance of back pain.
Try adjusting stem / seat height, saddle height / tip, and fore / aft position to lessen load on the low back. Stretching the gluteals, hamstrings, and low back can also help. Core strengthening can help you to maintain a more stable and less loading position on the bike.
 Bikefit - Neck Pain
Neck Pain
Neck pain is often described by cyclists who have adopted a position with too much drop. This leads to excessive neck extension which loads the joints of the neck and overworks the extensor muscles of the neck which are in a mechanically disadvantaged position. Too much reach can create the same problem. Try adjusting the amount of drop and the reach to lessen load on the neck. Make sure the elbows are not locked out as this lessens the ability for the upper limbs to absorb load. Try looking out of the top of your glasses when looking up the road rather than extending the neck to do so. Strengthen your scapular retractors and deep neck flexor musculature to help maintain a better neck posture on the bike.
Neck pain is often described by cyclists who have adopted a position with too much drop. This leads to excessive neck extension which loads the joints of the neck and overworks the extensor muscles of the neck which are in a mechanically disadvantaged position. Too much reach can create the same problem. Try adjusting the amount of drop and the reach to lessen load on the neck. Make sure the elbows are not locked out as this lessens the ability for the upper limbs to absorb load. Try looking out of the top of your glasses when looking up the road rather than extending the neck to do so. Strengthen your scapular retractors and deep neck flexor musculature to help maintain a better neck posture on the bike.
 Bikefit - Upper Limb Pain
Upper Limb Pain
Shoulder Pain- posterior shoulder and shoulder blade pain often develop when too much weight is placed through the handlebars. This occurs with too much drop / too much reach. Adjust your bike position accordingly. Try to adopt a position which allows for the shoulder blades to be held in a retracted posture. Strengthening scapular stabiliser musculature can help to lessen load transferred through the shoulders / thoracic spine.
Triceps / Elbow Pain- If the elbows are locked out (i.e. too much reach) this overloads the back of the elbow joint creating pain (posterior impingement). If too much weight is carried through the handlebars this overloads the triceps which counter the forward moment. Try to lessen reach / drop to deload the upper limbs.
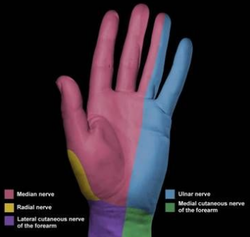
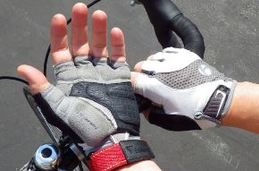
Hand / Finger Issues- ulnar / median nerve compression is common in cyclists. Median nerve compression is also known as carpal tunnel syndrome. This condition leads to pain / tingling and or numbness in the hand / fingers involving (in part) the palmar surface of the thumb, 2nd and 3rd finger and half of the 4th finger. Increased weight carried through the upper limbs often creates this condition: try to lessen drop / reach / saddle forard tip to decrease weight through the hands.
|
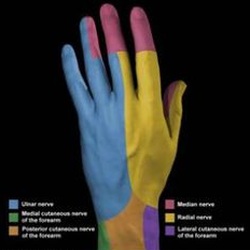
Ulnar nerve compression (Handlebar palsy) leads to pain / tingling and or numbness over the ulnar aspect of the hand (palmar / dorsal surfaces) and the 5th finger / half of the 4th finger. This is due to compression of the ulnar nerve in the Guyon's canal at the base of the hand. Padded gloves can help to decrease compression as can altering handlebar position / hood positioning. Thicker bar tape call also help. Try to lessen drop / reach / saddle forward tip to de-load the upper limbs.
|
Useful Links for Cyclists in the Southwest
|
|
 Bike Shed Dunsborough Bike Shed Dunsborough
|
 Dunsborough and Districts Country Club Dunsborough and Districts Country Club
|
Go To Our Sports Rehab Page for more Cycling Injury Prevention Tips and much more: Click / Tap Here.