
Post-Op Protocols: Dunsborough Physiotherapy Centre
Find below post-operative protocols for total knee replacement, total hip replacement, rotator cuff repair, and ACL reconstruction. At Dunsborough Physiotherapy Centre we employ up-to-date research-based post-op protocols to help you recover from surgery as rapidly as possible. To ensure you progress your rehabilitation safely and effectively you should make an appointment with one of our highly experienced physio team members at Dunsborough Physiotherapy Centre.
If you have any queries in regard to the protocols documented here please contact Dunsborough Physiotherapy Centre (phone: 08 97553600).
Visit our "Physio Exercises" page for great images and descriptions of exercises listed in the protocols below: click / tap here.
If you have any queries in regard to the protocols documented here please contact Dunsborough Physiotherapy Centre (phone: 08 97553600).
Visit our "Physio Exercises" page for great images and descriptions of exercises listed in the protocols below: click / tap here.
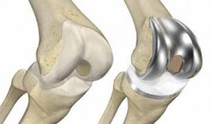 Total Knee Replacement
Total Knee Replacement Post-Op Protocol
0 - 2 Weeks
Goals
- Reduce Swelling
- Increase ROM (aim for 90 degrees+ knee flexion)
- Improve muscle action (VMO, gluteals, hamstrings)
- Limit risk of DVT (regular lower limb ROM exercises)
- Limit risk of respiratory complications (deep breathing exercises / mobility)
- Apply ice to minimise joint swelling over first 4-5 days (20 mins on every 3-4 hours). Ice after exercises.
- After the first week heat packs may be used on the knee and thigh prior to exercises.
- Circumferential compression (tubigrip) can be applied from ankle to thigh to help reduce swelling.
- Elevate the affected limb to minimize swelling. Ankle exercises should be carried out for DVT prophylaxis.
- Deep breathing exercises performed to limit basal atelectasis.
- Quadriceps strengthening: straight leg raise (supine), VMO exercises over roll, IRQ exercises (knee extension in supine over roll / seated), IRQ lock out.
- Gluteal strengthening: isometric (clenching), bridging, clam
- Hamstring strengthening: active flexion in standing (non-weighted)
- Calf strengthening: elastic resisted soleus / gastrocs
- ROM Exercises: passive knee straightening with a heel roll - supine, passive seated knee extension, prone knee hang.
- ROM Exercises: passive knee flexion - towel heel slides (seated), leg crossed passive knee flexion.
- Transfers - lying to standing, and seated to standing.
- Gait training with crutches, including stairs.
- Into and out of a car unaided.
- Weight bear as tolerated.
3 - 6 Weeks
Goals
- Increased weight bearing (with the aid of crutches)
- Reduce swelling
- Increased lower limb strength (progressing to weight bearing activities)
- Increase ROM (full knee extension, 90-100 degrees knee flexion)
General Care
- Ice after exercise
- Heat packs may be used on the knee and thigh prior to exercises.
- Circumferential compression dressing (tubigrip) from ankle to thigh.
- Ankle exercises (pumps) for DVT prophylaxis.
Range of Motion / Strengthening Exercises
- Patellar mobilization exercises.
- Quads and hamstrings deep tissue massage.
- Range of motion exercises (active, active assisted, passive)
- Stretching exercises: calf, hamstring, quads, gluteals
- Strengthening exercises: isometric quads, hamstrings, gluteals (extensors), gluteals (abductors), adductors, calves.
- Core stabilizing exercises.
- Hydrotherapy after week 3.
Functional Activities
- Gait: normalize gait using crutches, progressing to a single stick.
- Weight bearing as tolerated.
- Increase endurance with longer walks and stairs. Patients should be walking without aids by 6 weeks post-op.
- Patient should be achieving flexion ROM >90° by 6 weeks post-op.
7 - 12 Weeks
Goals
- Return of functional activity (swimming, bike riding, walking)
- Full ROM (flexion - 120 degrees+, full knee extension)
- Mild effusion
- Grade 4+ - 5 muscle strength
- Wound massage with Bio-oil or Vitamin E cream.
- Quads and hamstrings deep tissue massage.
- Patellar mobilization exercises.
Range of Motion / Strengthening Exercises
- Squats and single leg stance mini-squats. Resistance exercises for quadriceps, hamstrings, gluteals (extensors), gluteals (abductors), adductors and calves.
- Active and active assisted ROM exercises.
- Core stabilization exercises.
Functional Exercises
- Start driving using the affected leg.
- Gait supervision without walking aids.
- Lateral stepping.
- Heel-toe walking.
- Exercise bike (can start earlier if good balance)
13 + Weeks
- Once the patient has achieved full knee extension (0 degrees) and full knee flexion >110° unaided, gait should be normalized.
- Good proprioception (balance) should be aimed for.
- An ongoing program of regular exercise tailored to the patient should be instituted. This may include regular walking, exercise bike, hydrotherapy, gentle gym workouts, return to sport (golf, doubles tennis, lawn bowls, etc). The patient should continue their exercise program indefinitely, to optimize the outcome from their surgery.
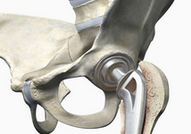 Total Hip Replacement
Total Hip Replacement Post-Op Protocol
Total hip arthroplasty (THA) is an elective operative procedure to treat an arthritic hip. This procedure replaces your damaged hip joint with an artificial hip implant. Hip implants consist of a smooth ball on a stem that fits into the shaft of your thigh bone (the femoral stem), and a metal socket with a smooth liner that sits within the socket of your pelvis (acetabular cup).
Once in place, the artificial ball and socket function like a normal hip joint. There are several surgical approaches to hip replacement surgery, and each is effective. Your surgeon will determine which surgical approach is best for you. The goals of this surgery are to decrease pain, and maximize function.
The protocol described below applies to the routine primary total hip arthroplasty procedure. For a revision total hip arthroplasty additional limitations and / or precautions may apply. Contact your surgical team to discuss specific parameters if you are having a revision surgery.
The following protocol should be used as a guideline for rehabilitation progression, but may need to be altered pending the nature and extent of the surgical procedure, healing restraints or patient tolerance.
Total hip precautions after surgery should be followed for 3 months and include:
Weight bearing is as tolerated with a walking aid deemed appropriate by your physiotherapist (often elbow crutches). The patient may progress from a walker / elbow crutches to one crutch / walking stick when they can demonstrate equal weight distribution, adequate balance, and limited Tredelenburg gait or limp. Driving is prohibited for the first 6 weeks or until off stronger pain medication. At approximately 21 days post-op, begin scar massage. A shower chair is recommended for the first 3 months.
1 - 3 Weeks (Phase II)
Goals
General Care
Precautions
ROM / Strengthening Exercises
Functional Activities
3-6 Weeks (Phase III)
Goals
General Care
Functional Activities
6-12 Weeks (Phase IV)
Goals
General Care
Precautions
ROM / Strengthening Exercises
Functional Activities
3+ Months
Total hip arthroplasty (THA) is an elective operative procedure to treat an arthritic hip. This procedure replaces your damaged hip joint with an artificial hip implant. Hip implants consist of a smooth ball on a stem that fits into the shaft of your thigh bone (the femoral stem), and a metal socket with a smooth liner that sits within the socket of your pelvis (acetabular cup).
Once in place, the artificial ball and socket function like a normal hip joint. There are several surgical approaches to hip replacement surgery, and each is effective. Your surgeon will determine which surgical approach is best for you. The goals of this surgery are to decrease pain, and maximize function.
The protocol described below applies to the routine primary total hip arthroplasty procedure. For a revision total hip arthroplasty additional limitations and / or precautions may apply. Contact your surgical team to discuss specific parameters if you are having a revision surgery.
The following protocol should be used as a guideline for rehabilitation progression, but may need to be altered pending the nature and extent of the surgical procedure, healing restraints or patient tolerance.
Total hip precautions after surgery should be followed for 3 months and include:
- Avoid hip flexion past 90°
- Avoid internal rotation of the lower extremity
- Avoid crossing the midline of the body
- Avoid sitting on low, soft surfaces
- Use a raised toilet seat for 6 weeks – 3 months (discussed with the surgeon at the 6 week visit)
- A seated wedge may be required to limit hip flexion when in sitting
Weight bearing is as tolerated with a walking aid deemed appropriate by your physiotherapist (often elbow crutches). The patient may progress from a walker / elbow crutches to one crutch / walking stick when they can demonstrate equal weight distribution, adequate balance, and limited Tredelenburg gait or limp. Driving is prohibited for the first 6 weeks or until off stronger pain medication. At approximately 21 days post-op, begin scar massage. A shower chair is recommended for the first 3 months.
1 - 3 Weeks (Phase II)
Goals
- Allow healing / maintain safety (prevent dislocation)
- Reduce pain, inflammation, and swelling
- Increase range of motion (ROM) while adhering to precautions
- Increase strength
- Increase functional independence
- Gait training – Appropriate use of walking aid to achieve normal gait pattern
General Care
- Cold pack or ice pack for 10-15 minutes 3x/day to manage pain and swelling.
- After the first week heat packs may be used on the knee and thigh prior to exercises.
- Elevate the affected limb to minimize swelling. Ankle exercises should be carried out for DVT prophylaxis.
- Deep breathing exercises performed to limit basal atelectasis.
Precautions
- Posterior approach: no hip flexion > 90 º no hip internal rotation or adduction beyond neutral. No combination of above motions allowed for 6 weeks post-op
- Direct anterior approach: Active hip extension and external rotation is allowed. Limit passive extension and external rotation. Encourage normal extension/stride with gait
- Lateral approach: Avoid passive and active extension with external rotation for 6 weeks post-op
ROM / Strengthening Exercises
- To be performed 3x/day after instruction by physio.
- Passive / Active Assisted / Active range of motion exercises in supine position (lying on back): ankle pumps, heel slides. Hip abduction/adduction, hip internal/external rotation, hip flexion/extension only to be performed within ROM precaution guidelines noted above.
- Passive / Active Assisted / Active ROM exercises in sitting: long arc quads, ankle pumps. All exercises to be performed within ROM precaution guidelines.
- Strengthening: quadriceps sets in full knee extension, gluteal sets, short arc quadriceps (SAQ), hooklying ball / towel squeeze.
Functional Activities
- Achieving transfers safely / independently (supine to sit, sit to stand, stand to sit)
- Gait Training - training with walking aid including uo / down stairs. Wean from walker to crutches to cane only if no gait deviation present.
3-6 Weeks (Phase III)
Goals
- Reduce pain, inflammation, and swelling
- Increase range of motion (ROM) while adhering to precautions
- Increase lower extremity and trunk strength while adhering to precautions
- Balance and proprioceptive training to assist with functional activities
- Gait training: wean off walking aid able to ambulate without deviation
- Functional activity training to enhance patient autonomy with ADLs / mobility
General Care
- Cold pack or ice pack for 10-15 minutes 3x/day to manage pain and swelling.
- After the first week heat packs may be used on the knee and thigh prior to exercises.
- Elevate the affected limb to minimize swelling. Ankle exercises should be carried out for DVT prophylaxis.
- Passive / Active Assisted / Active range of motion exercises in supine position (lying on back): ankle pumps, heel slides. Hip abduction/adduction, hip internal/external rotation, hip flexion/extension only to be performed within ROM precaution guidelines noted above.
- Passive / Active Assisted / Active ROM exercises in sitting: long arc quads, ankle pumps. All exercises to be performed within ROM precaution guidelines.
- Strengthening: quadriceps sets in full knee extension, gluteal sets, short arc quadriceps (SAQ), hooklying ball / towel squeeze.
- Transverse abdominus and level 1 trunk stabilization
- 3-way straight leg raise (SLR) (flexion, abduction, extension-no extension for lateral approach until week 6)
- Closed chain weight shifting activities including side-stepping
- Balance exercises: single leg stance, alter surface, eyes open/closed
- Lateral step up and step down with eccentric control / front step up and step down
Functional Activities
- Sit to stand activities
- Lifting and carrying
- Ascending / descending stairs
- Gait Training
- Stationary Bike
6-12 Weeks (Phase IV)
Goals
- Increase overall strength throughout lower extremities (grade 4/5)
- Return to all functional activities
- Begin light recreational activities
General Care
- Massage of scar incision site if thickening.
- Lessening use of stronger pain medication
Precautions
- Precautions are lifted at 6 weeks post-op unless otherwise specified by surgeon
ROM / Strengthening Exercises
- Progress Phase III exercises by increasing resistance and repetitions
- Progress trunk stabilization exercises
- Front lunge and squat activities
- Progress balance and proprioception activities (STAR and ball toss, perturbations)
- Initiate overall exercise and endurance training (walking, swimming, progress biking)
Functional Activities
- No pain with functional activities of daily living
- Patient is independent with reciprocal stair climbing
3+ Months
- Continue walking, swimming and bike-riding programs for aerobic conditioning / endurance
- Begin playing golf and outdoor cycling
- Obtain clearance from surgeon for return to impact sports such and tennis or jogging
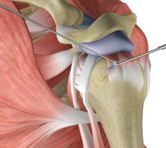 Rotator Cuff Repair
Rotator Cuff Repair Post-Op Protocol
The rotator cuff is a group of muscles and tendons that form a cuff over the shoulder joint. These muscles and tendons hold the ball of the humerus (arm bone) in its joint and help the shoulder joint to move effectively. The tendons can be torn from overuse or injury. Rotator cuff repair is surgery to repair torn tendon/s in the shoulder. The procedure can be done with a large (open) incision or with shoulder arthroscopy (which uses small buttonhole-sized incisions: to allow for .
Three common techniques are used to repair a rotator cuff tear:
Reasons rotator cuff repair may be done include:
0 to 6 weeks
Goals:
Precautions / Protocols:
Exercises:
6 to 12 weeks
Goals:
Precautions:
Exercises:
The exercises listed below may be gradually integrated into the rehabilitation program under the supervision of your physiotherapist.
12-18 weeks
Goals:
Precautions:
Exercises:
The exercises below form a list that may be gradually integrated into the rehabilitation program under the supervision of your physiotherapist. Resistance exercises are now incorporated utilising hand weights / resitance elastics.
Stretching-
Pendular exercises
Pulley exercises (flexion / abduction)
Supine external rotation (broomstick)
Standing external rotation (doorway stretch)
Supine passive arm elevation
Behind the back internal rotation (towel stretch)
Hands-behind-head stretch
Supine cross-chest stretch
Standing forward flexion (scaption)
Sidelying internal rotation stretch
External rotation at 90° abduction stretch
Wall walking (flexion / abduction)
Strengthening-
Supraspinatus strengthening (weighted / theraband resisted)
Sidelying external rotation (weight resisted)
Sidelying internal rotation (weight resisted)Prone Horizontal Arm Raises “T”
Upright external rotation (weighted / theraband resisted)
Theraband external rotation (standing) : 0 degrees abduction -> 90 degrees abduction
Theraband internal rotation (standing) : 0 degrees abduction -> 90 degrees abductionProne scaption “Y”
Prone rows
Upright rows
Low rows
Scapulohumeral rhythm exercises
PNF manual resistance with physiotherapist
Propriocetion drills with fit-ball, bosu-ball, balance-disc, wobble-board
Forward punch (theraband resisted in standing) / supine weight resisted
Shoulder shrugs
Dynamic hug “W”’s - prone weighted / upright theraband resisted
Seated rows (theraband resisted)
Biceps curls
18 to 26 weeks
Goals:
Precautions:
Exercises:
Stretching-
Strengthening: It is recommended that these exercises be limited to resistance not to exceed 3kg.
The rotator cuff is a group of muscles and tendons that form a cuff over the shoulder joint. These muscles and tendons hold the ball of the humerus (arm bone) in its joint and help the shoulder joint to move effectively. The tendons can be torn from overuse or injury. Rotator cuff repair is surgery to repair torn tendon/s in the shoulder. The procedure can be done with a large (open) incision or with shoulder arthroscopy (which uses small buttonhole-sized incisions: to allow for .
Three common techniques are used to repair a rotator cuff tear:
- Open repair, a surgical incision is made and a large muscle (the deltoid) is gently moved out the way to do the surgery. Open repair is done for large or more complex tears.
- Arthroscopy, the arthroscope is inserted through small incision. The scope is connected to a video monitor. This allows the surgeon to view the inside of the shoulder. One to three additional small incisions are made to allow other instruments to be inserted.
- Mini-open repair, any damaged tissue or bone spurs are removed or repaired using an arthroscope. Then during the open part of the surgery, a 2- to 3-inch incision is made to repair the rotator cuff.
- The tendons are re-attached to the bone.
- Small rivets (called suture anchors) are often used to help attach the tendon to the bone. The suture anchors can be made of metal or material that dissolves over time, and do not need to be removed.
- Sutures (stitches) are attached to the anchors, which tie the tendon back to the bone.
Reasons rotator cuff repair may be done include:
- You have shoulder pain when you rest or at night, and it has not improved with exercises over 6 to 12 months.
- You are active and use your shoulder for sports or work.
- You have weakness and are unable to do everyday activities.
- You have a large or a complete rotator cuff tear.
- A tear was caused by a recent injury.
- The tendons of the rotator cuff were not already torn from chronic rotator cuff problems.
0 to 6 weeks
Goals:
- Protect the rotator cuff repair
- Ensure wound healing
- Prevent shoulder stiffness
- Regain range of motion
Precautions / Protocols:
- Sling protocol: use your sling most of the time. Remove the sling 4 or 5 times a day to do physiotherapy exercises.
- Use of the affected arm: you may use your hand on the affected side in front of your body (elbow by side) but DO NOT raise your arm or elbow away from your body. You may flex your arm at the elbow.
- No lifting of objects.
- No excessive shoulder extension (arm behind body).
- No excessive stretching or sudden movements.
- No supporting of body weight by hands
- Showering: you may shower or bath and wash the incision area. To wash under the affected arm, bend over at the waist and let the arm passively come away from the body. It is safe to wash under the arm in this position.
- Ice: use ice as necessary 15- 20 minutes
Exercises:
- Pendular Exercises (circular / forward / back and side to side)
- Supine passive flexion (hand to mouth, nose, forehead, pillow...)
- Passive desk slides (flexion)
- Passive broomstick external rotation
- Passive broomstick flexion / abduction to 90 degrees
- Pasive shoulder internal rotation (3 weeks+)
6 to 12 weeks
Goals:
- Lessening pain
- Protect the rotator cuff repair
- Improve range of motion of the shoulder via a mixture of passive and active assisted exercises.
- Begin gentle strengthening activities (gravity resisted) as instructed by your physio.
Precautions:
- Sling protocol: your sling is no longer necessary unless your doctor instructs you to continue using it.
- Use of the operated arm: you should continue to avoid lifting your arm away from your body. You can lift your arm forward in front of your body but not to the side.
- Bathing and showering: continue to follow the instructions from the instructions above.
Exercises:
The exercises listed below may be gradually integrated into the rehabilitation program under the supervision of your physiotherapist.
- Pendular exercises as above
- Passive supine external rotation (broomstick): 0 -> 90 dgrees abduction)
- Active-assisted upper limb elevation (wall walking)
- Active assisted pulleys: flexion -> abduction
- Standing external rotation (0 degrees abduction -> 90 degrees abduction)
- Passive upper limb elevation (as above)
- Hand behind back / internal rotation (supine)
- Supine cross-chest stretch
- Active motion side-lying external rotation (10 weeks)
- Prone horizontal arm raises “T”
- Prone row prone scaption “Y”
- Standing forward flexion (scaption) with correct scapulohumeral rhythm
12-18 weeks
Goals:
- Protect the rotator cuff repair
- Regain full range of motion
- Continue to improve strength in preparation for return to full duties / sport
Precautions:
- Use of the operated arm: you may now safely use the arm for normal daily activities involved with dressing, bathing and self-care.
- You may raise the arm away from the body; however, you should not raise the arm when carrying objects greater than one kilogram initially.
- Any forceful pushing or pulling activities could disrupt the healing of your surgical repair.
Exercises:
The exercises below form a list that may be gradually integrated into the rehabilitation program under the supervision of your physiotherapist. Resistance exercises are now incorporated utilising hand weights / resitance elastics.
Stretching-
Pendular exercises
Pulley exercises (flexion / abduction)
Supine external rotation (broomstick)
Standing external rotation (doorway stretch)
Supine passive arm elevation
Behind the back internal rotation (towel stretch)
Hands-behind-head stretch
Supine cross-chest stretch
Standing forward flexion (scaption)
Sidelying internal rotation stretch
External rotation at 90° abduction stretch
Wall walking (flexion / abduction)
Strengthening-
Supraspinatus strengthening (weighted / theraband resisted)
Sidelying external rotation (weight resisted)
Sidelying internal rotation (weight resisted)Prone Horizontal Arm Raises “T”
Upright external rotation (weighted / theraband resisted)
Theraband external rotation (standing) : 0 degrees abduction -> 90 degrees abduction
Theraband internal rotation (standing) : 0 degrees abduction -> 90 degrees abductionProne scaption “Y”
Prone rows
Upright rows
Low rows
Scapulohumeral rhythm exercises
PNF manual resistance with physiotherapist
Propriocetion drills with fit-ball, bosu-ball, balance-disc, wobble-board
Forward punch (theraband resisted in standing) / supine weight resisted
Shoulder shrugs
Dynamic hug “W”’s - prone weighted / upright theraband resisted
Seated rows (theraband resisted)
Biceps curls
18 to 26 weeks
Goals:
- Continue to protect the repair by avoiding excessive forceful use of the arm or lifting excessively heavy weights.
- Restore full shoulder motion
- Restore full shoulder strength
- Gradually begin to return to normal activity activities
Precautions:
- Sports that involve throwing and the use of the arm in the overhead position are the most demanding on the rotator cuff. Your physiotherapist will provide you with specific instructions on how and when to return to surfing, swimming, golf, tennis,volleyball, and throwing sports etc.
- For people who wish to return to training with weights, your physio will give you guidelines regarding the timing of this return.
- The following timetable can be considered as a minimum for return to most activities: Skiing: 6 months. Golf: 6 months. Weight training: 6 months. Tennis: 6 -8 months. Swimming: 6-8 months. Throwing: 6 months before returning safely to your activity
- You must have full range of motion, full strength and no swelling or pain prior to returning to sport. Your physiotherapist will provide you with a specific interval-training program to follow when it is time to return the above activities.
Exercises:
Stretching-
- Pendular exercises
- Pulley exercises (flexion / abduction)
- Supine external rotation (broomstick)
- Standing external rotation (doorway stretch)
- Supine passive arm elevation
- Behind the back internal rotation (towel stretch)
- Hands-behind-head stretch
- Supine cross-chest stretch
- Standing forward flexion (scaption)
- Sidelying internal rotation stretch
- External rotation at 90° abduction stretch
- Wall walking (flexion / abduction)
Strengthening: It is recommended that these exercises be limited to resistance not to exceed 3kg.
- Functional sport specific resisted movement patterns incorporated
- Plyometric activities as instructed by your physio
- Supraspinatus strengthening (weighted / theraband resisted)
- Sidelying external rotation (weight resisted)
- Sidelying internal rotation (weight resisted)Prone Horizontal Arm Raises “T”
- Upright external rotation (weighted / theraband resisted)
- Theraband external rotation (standing) : 0 degrees abduction -> 90 degrees abduction
- Theraband internal rotation (standing) : 0 degrees abduction -> 90 degrees abductionProne scaption “Y”
- Prone rows
- Upright rows
- Low rows
- Scapulohumeral rhythm exercises
- PNF manual resistance with physiotherapist
- Propriocetion drills with fit-ball, bosu-ball, balance-disc, wobble-board
- Forward punch (theraband resisted in standing) / supine weight resisted
- Shoulder shrugs
- Dynamic hug “W”’s - prone weighted / upright theraband resisted
- Seated rows (theraband resisted)
- Biceps curls
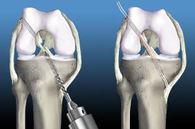
ACL Reconstruction Post-Op Protocol
0-2 Weeks
Goals:
Exercises:
Goals:
- Partial weight bearing (elbow crutches) to full weight bearing.
- Reduce Swelling / decrease graft site pain.
- Reasonable quadriceps / hamstring strength.
- ROM: 0-100 degrees.
Exercises:
- VMO setting.
- Knee flexion ROM exercises - Seated Heel Slide Active Assisted (Knee Flexion).
- Knee extension ROM exercises - Prone knee hang.
- Resisted hip abduction / extension (elastic).
- Calf raises.
- Gait re-education.
2-6 Weeks
Goals:
Exercises:
STRENGTH
FLEXIBILITY
FUNCTIONAL ACTIVITIES
6+ Weeks
Goals:
Exercises:
STRENGTH
FUNCTIONAL ACTIVITIES
Goals:
- Full ROM knee extension.
- Knee flexion ROM - 130 degrees.
- Walking with good technique (in water / on land).
- Proprioception improvement.
- Good quadriceps / hamstring strength.
- Decreasing swelling.
- Maintaining gluteal / calf tone.
- Decreasing graft site pain.
- Good patellar mobility.
Exercises:
STRENGTH
- VMO contractions (isometric) - vary knee flexion ROM
- Hamstrings (standing - no weight resistance) - open chain
- Bridging (double -> single) / bridge walking
- Hip abduction (gravity resisted / weighted clam / long lever in side-lying), elastics / ankle weights in sidelying / standing.
- Closed chain quads
- Wall slides
- Lunges -> lunge slides
- Step up / downs
- Proprioception exercises (Single leg balance, wobble board, balance disc, bosu ball)
FLEXIBILITY
- Knee flexion - towel assisted in long sitting / seated active assisted
- Knee extension - prone knee hang / passive extension with rolled towel / seated
FUNCTIONAL ACTIVITIES
- Exercise bike
- Walking
6+ Weeks
Goals:
- Improving strength : return of grade 5 strength and return of muscle bulk
- Full ROM knee extension / flexion
- Improved proprioception preparing for return to sporting pursuits
- Introduction of straight line followed by multi-directional activities
- Introduction of plyometrics in preparation for return to sport
Exercises:
STRENGTH
- Leg Press (double -> single) : 6 weeks
- Plyometrics: Landing drills / hopping drills: straight line -> multi-directional : 10-14 weks
- Direction changes at pace / sprints : 14 - 28 weeks
FUNCTIONAL ACTIVITIES
- Exercise bike
- Walking
- Swimming (initially with float between legs) : 6 - 12 weeks
- Jogging (straight line) : 12 - 16 weeks
- Road bike : 10 weeks